
About Grid Options
In Unite, you typically do most of your daily work on admissions workflow grids and marketing grids. Admissions workflow grids provide information to help manage people and move applications through the admissions process. They include grids you see in the PEOPLE, APPLICATIONS, and REVIEWS areas of Unite. Marketing grids provide information to help manage events and email communications. They include grids you see in the EVENTS and JOURNEYS areas of Unite. Depending on the type of grid, Unite may look and operate differently.
The following table provides a list of options you have when working with grids and illustrates the button or link you want to look for based on the grid type.
Grid Option |
Admissions Workflow Grids |
Marketing Grids |
|---|---|---|
| Remove filters applied to a column |  |
 |
| Select and deselect columns to show and hide on the grid |  |
 |
| Export information currently displaying in the grid to an MS Excel file |  |
 |
| Export information currently displaying in the grid to an Adobe .PDF file |  |
N/A |
| Filter data in a column |  |
 |
| Organize the grid by sorting, filtering, and hiding, or showing columns |
|
 , ,  , , |
| Clear all grid customizations and restore the grid to the default view |  |
|
| Arrange grid information in sequence from the lowest to the highest (A to Z, 1 to 100, newest to oldest, Lowest to Highest) |  |
Sort A to Z, 1 to 100, or Lowest to Highest |
| Arrange grid information in sequence from the highest to the lowest (Z to A, 100 to 1, oldest to newest, Highest to Lowest) |  |
Sort Z to A, 1 to 100, or Highest to Lowest |

In addition to how they look, admissions workflow grids and marketing grids may operate a little differently as well.
Control records on a page
On an admissions workflow grid, you can adjust the number of records that display on a page from 10 to 500. You can also select individual page numbers to display the records on just that specific page. The default number of records on a page is 25.
On a marketing grid, you cannot change the number of records that display on a page. However, you can select individual page numbers by letter to display just the records that begin with the selected letter. You can also display records that begin with a number. The default number or records on a page is 50.
Group by column
Admissions workflow grids have an option that marketing grids do not have. On an admissions workflow grid, you can group information. Between the grid toolbar and the table header, there is a grouping bar. As illustrated below, you can find the grouping bar by looking for the prompt, “Drag a column header and drop it here to group by that column”.
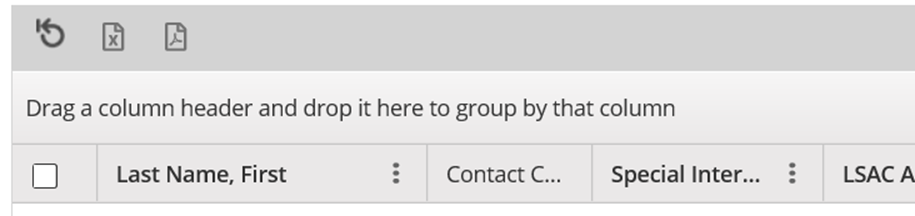
In the grouping bar, you can drag and drop columns to create hierarchical groups. The first column you add to the grouping bar is the top level. Each column you add thereafter is nested under the other. Once grouped, you can collapse and expand columns to focus on information for specific groups.
Sort data
For both admissions workflow grids and marketing grids, you can sort data and you can use the arrows in the column headings to identify the sort order. The arrow pointing up means the sort order is ascending, and the arrow pointing down means the sort order is descending.
The way you sort data is different. On an admissions workflow grid, you can click a column header to sort the data. The column headers toggle between ascending and descending order, and the number that displays next to the arrow indicates the number of columns that are sorted at any given time.
On a marketing grid, the column headers do not toggle. Instead, the column headers have a drop-down menu with options for filtering and sorting data in the grid. In addition, the column headers on marketing grids do not show the number of columns that are sorted. In fact, you can only sort one column at a time.
Arrange columns
The way you arrange columns on admissions workflow grids is different from marketing grids. On an admissions workflow grid, you can drag and drop to place columns in a specific order. However, the placement of the Last Name, First column is fixed as the first column on every grid.
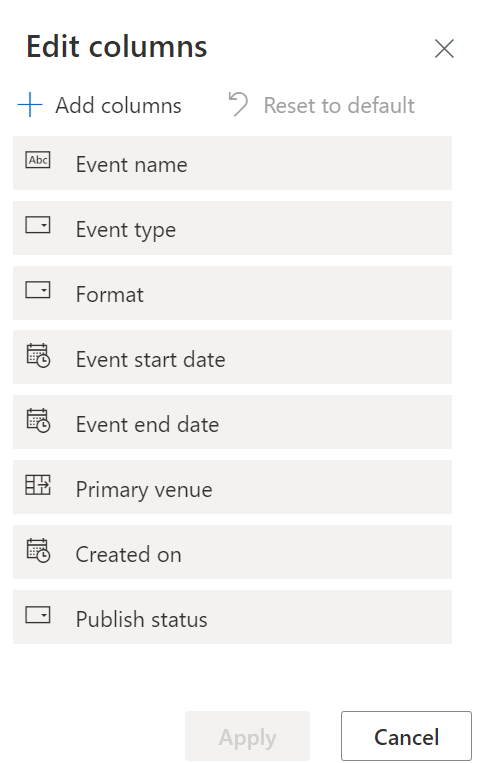
On a marketing grid, you change the column order by changing the column options and moving the columns up or down in the list as shown in the following image.
Adjust columns
In both admissions workflow grids and marketing grids, you can drag a column border to increase or decrease the width of the column. You can also double-click the column border for Unite to automatically resize the column show the full column name. Keep in mind, the wider you make the columns, the more you may have to scroll left to right. The narrower you make the columns, the more you may have to scroll up and down.